DIY Hanging Ornament
I’m really excited to (almost) kick off the new year sharing a collaboration with you guys. Throughout 2017 I’ll be pairing up with Cass Art and be participating in different challenges along the way. The first challenge is all about inspiration and creativity, as part of their #BeInspired campaign.
I find a lot of my inspiration comes from browsing the internet and speaking with other creatives online. It’s no secret that Pinterest is a huge source of inspiration for me and many others, and I’d definitely recommend having a look if you’re after some crafty ideas.
I know some people feel like they don’t have a creative bone in their body, but I just don’t think that’s true! If you’ve ever made a card, drawn a doodle, arranged a mantelpiece or even decorated a notebook, it all counts. I have my fingers in many pies when it comes to creativity and crafts, but that doesn’t mean you have to. Following a simple DIY is being creative and I’m sharing one with you today, using some basic tools and materials.
The materials you will need are:
DAS Modelling Clay in white, DAS Idea Mix (Red or blue), Craft Knife, Rolling pin, Twine, Needle, Nail File
The main material for this post is the DAS Air drying clay. I’ve been using this clay for years and years and it is great value for money – it lasts ages and doesn’t dry out thanks to the re-sealable packet. I was really happy to see they now do it in different colours too – much easier than having to paint it afterwards as well as being able to create a marbled effect, which we’ll do in this DIY.
Step one - Mixing the Clay
Grab a chunk of white clay and a smaller piece of the coloured clay. Roll them both into sausages and wrap the thinner coloured piece around the white. Squish it all up together and use your hands to knead it into a ball.
Step two - Keep rolling (rolling, rolling)
Take your rolling pin and roll it out. The DAS rolling pin I am using has bands that slip on and off and are a great way to keep the clay even in width. For reference, I took of the larger bands and kept the smaller ones on, so the clay was about 3-4mm thick.
Step three - Making your shapes
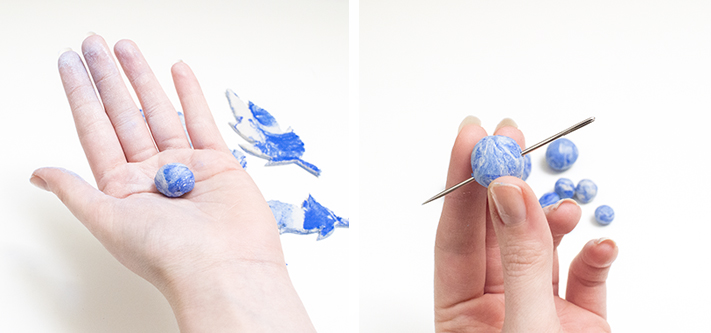
Cut out feather shapes using a craft knife. Search ‘Feather shape’ on Google images if you need some references. With the rest of the clay, take pieces and roll them into balls to make beads. Create a mixture of medium and small sized balls, and use a large needle to poke through the middle to make them into beads. The hole has to be big enough to thread through your twine so bear this in mind!
Step four - Sand and glaze
I find cutting clay with a craft knife leaves quite a rough edge. To soften all the feather edges and to get rid of any lumps, you can simple sand these off. Because the shapes are so small and some of the edges will be delicate, instead of using sandpaper, use a nail file! It’s perfect for getting into the small angles. Using DAS Glossy Effect varnish, paint the shapes to give them a professional, glazed finish.
Step five - Piecing it together
Now for the fun part, putting it all together! Take your twine and cut 5 pieces in various lengths. Tie them all together and use a separate piece to tie around the knot and create a loop. Thread your beads on to the various pieces of twine and knot after each one – stagger these down each of the pieces so they don’t all end up at the top. Remember to leave enough loose twine at the bottom of each strand so you can attach the feather shapes. Tie the end of your strings around the quill of the feathers.
That’s all there is to it! I’ve hung mine on a door and I love the way it looks – the blue of the DAS Idea Mix clay marbled with the white gives it an almost ethereal look. It’s a definite nod back to my days of being a teenager and having a Dreamcatcher in my room – only a bit more sophisticated!
The beauty of this, and any DIY or project you ever make, is that is can always be customised to your preferences. You can make the choices and adapt things to suit – having a starting point is always handy, but you can really let your creativity go wild from there!
Do let me know if you make your own or if you’ve got any ideas to share as to what else we can make with the DAS clay. Don’t forget to have a browse of the #BeInspired hashtag on social media to have a look what other creatives have made for this Cass Art challenge and get a bit of inspiration for your next project!


